Installing MOAB using
USB memory stick named disk2 for file storage
FOR RouterOS v 6.x
Note that MOAB Scripts shown in Step 4 and 5 below are for illustration purposes only. The actual scripts with proper host credentials will be provided to you via e-mail when your MOAB Trial or paid subscription is initiated.
Step 1: Use Winbox and go to System Disk then select the USB stick that you inserted into the Router. Now click on Format Drive and populate the various fields exactly as shown in the Format Drive screen below then click on Start.

Step 2: Using Winbox Terminal you will now paste in the following script to determine which USB stick to rename as disk2. Type /disk print as shown below and pay attention to the response showing # numbers after you execute the directive.
Step 3: In this example we will rename disk1 to be disk2. Using Winbox Terminal you will now copy and paste in the following directive:
/disk set 0 name=disk2
and then execute the directive - Notice that we used # 0 that represents the disk we want to rename ... so you have to make sure that you select the correct number for the USB disk to be renamed and used in this directive.
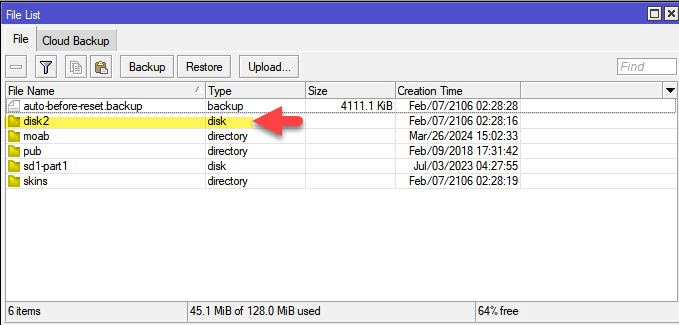
Now open Winbox Files to see if the USB named disk2 appears in the List as a disk as shown in the graphic below
Step 4: Using Winbox Terminal you will copy and paste in the following 4 scripts and execute the directive -- one script at a time.
/system script add comment="Get the Bad Guys and run it" name=fileiptik owner=admin policy=ftp,reboot,read,write,policy,test,password,sniff,sensitive,romon source=":if ([:len [/file find name=disk2/fileipdiff.txt]] >0) do={:if ([/file get disk2/fileipdiff.txt size] > 0) do={:tool fetch url=\"https://itexpertoncall.com/mt/fileiptik.rsc\" user=xxxxxxxxxxxx mode=https password=XXXXXXXXXXXXXXXX dst-path=disk2; :log info \"Downloaded fileiptik.rsc from itexpertoncall\"; :import file-name=disk2/fileiptik.rsc;} else={ :log info \"MOAB update not required\";:file remove disk2/fileipdiff.txt;}} else={:log info \"The file fileipdiff.txt does not exist!\"}\ \n\r\ \n"
/system script add comment="Get the Diff" name=pulldiff owner=admin policy=ftp,reboot,read,write,policy,test,password,sniff,sensitive,romon source="/tool fetch url=\"https://itexpertoncall.com/mt/fileipdiff.txt\" user=xxxxxxxxxxxx mode=https password=XXXXXXXXXXXXXXXX dst-path=disk2;\r\ \n"
/system scheduler add comment="Blacklist Bad Guys " interval=8h name=fileiptik on-event="/system script run fileiptik\r\ \n" policy=ftp,reboot,read,write,policy,test,password,sniff,sensitive,romon start-date=jun/10/2018 start-time=00:03:00
/system scheduler add comment="Pull Down the Diff Files" interval=8h name=diffevent on-event="/system script run pulldiff\r\ \n" policy=ftp,reboot,read,write,policy,test,password,sniff,sensitive,romon start-date=jun/10/2018 start-time=00:02:00
Step 5: Using Winbox Terminal you will now copy and paste in the following 2 scripts and execute the directive -- one script at a time starting with the first script that contains fileipdiff.txt THEN followed by the 2nd script that contains fileiptik.rsc
/tool fetch url="https://itexpertoncall.com/mt/fileipdiff.txt" user=xxxxxxxxxxxx mode=https password=XXXXXXXXXXXXXXXX dst-path=disk2
/tool fetch url="https://itexpertoncall.com/mt/fileiptik.rsc" user=xxxxxxxxxxxx mode=https password=XXXXXXXXXXXXXXXX dst-path=disk2
Note: The 2 scripts above will download the required files into your system.
Step 6: Using Winbox Terminal you will now copy and past then execute the following directive:
import file-name=disk2/fileiptik.rsc
The above directive will take approximately 2 minutes or less to run so please do not proceed to the next step immediately.
Step 7: Your MikroTik Firewall now needs to have the following rule created and placed as shown in the Graphic below:
/ip firewall filter add action=drop chain=input comment="INPUT DROP MOAB Blacklist" in-interface=ether1 log-prefix="Drop Blacklist" src-address-list=blacklist
Before you copy and paste the Firewall script shown above please confirm your MikroTik Router's ISP INTERNET port is ether1 [in-interface=ether1]. If its not ether1 change it in the script to the correct port you actually use for your INTERNET connection. NOW Copy and paste the Firewall script into Winbox Terminal then execute. Next open the Winbox IP Firewall screen and scroll to the very bottom then with your mouse or keyboard highlight the rule you pasted in using Terminal and drag & drop it into the same position as shown in the Firewall graphic below.
Placement and order of the Firewall rules is vitally important - improper
placement will have undesirable consequences where services and sites you expect to work will no longer function.
The only Firewall Rule for MOAB is placed in IP Firewall Filter Rules INPUT chain as
shown below.
- INPUT chain Established/Related ACCEPT
- INPUT chain invalid DROP
- INPUT chain MOAB blacklist DROP
- more rules .....
SPECIAL NOTE: Because the MOAB blacklist is extensive and very strict you may need to whitelist IP addresses like bogons which lists private and reserved IP's for internal use and IP addresses of servers and host that you must be able to communicate with. Many servers and Hosts are collocated in data centers [the Cloud] that unfortunately share space with the 'Bad Guys' so you must test those important IP addresses for connectivity and if they are blocked by MOAB then add those IP's to your MOAB Whitelist
Step 8: You will now need to adjust the MikroTik Schedular Start Time so that the 2 scheduler scripts provided [as shown in Step 4] are running based on your Local Time:

MOAB is updated 3 times each day @ 00:00:01 hours @ 08:00:00 hours @
16:00:00 hours
using Ottawa ON Canada GMT -4 when Daylight Savings Time is in effect and
using Ottawa ON Canada GMT -5 when Eastern Standard Time is in effect.
You should adjust the scheduled TIME intervals on your MikroTik Router to coincide with MOAB's GMT attribute so that it reflects
your geographic location - make sure that the ordering sequence of execution does not change and that there is at
least a 5 minute interval between each script launching. The Greenwich Mean Time
Converter can help you to determine the correct GMT time interval to use for your location.
Following is an example assuming your location is London England using GMT +1
The math here is going from Ottawa GMT-4 to London GMT+1 provides a difference of 5 hours and we suggest adding a
10 minute interval to that so that now adds up to +5:10
The scheduled scripts that we provide you are configured with the following defaults:
thediffevent Start-Time 00:02:00 THEN you would set your Start-Time to 05:12:00
fileiptik Start-Time 00:03:00 THEN you would set your Start-Time to 05:13:00
You are now finished the KICK START process. Everything from this point on will be controlled by your Router scheduler scripts.
MOAB - First Time User's
» e-mail « Request 10 day Free Trial of MOAB Blacklist Service